I offer you several ways to paint Easter eggs.
Easter eggs are a significant attribute of Easter, along with curd Easter and Easter cakes. We have already prepared all this and even one special cake.
Today we will consider and prepare painted Easter eggs for the celebration.
They paint eggs probably in a hundred, or even more ways.
We will consider some of the most interesting and simple ones.
How to paint eggs for Easter. Coloring Easter eggs step by step with a photo
First, the eggs must be prepared. This is very important in order for the eggs to be beautiful.
Menu:
- How to paint eggs for Easter to get multi-colored
- Original DIY eggs
- Easter very beautiful eggs
- Video - 5 ways to paint eggs in an original way for Easter
How to prepare for painting Easter eggs
Training:
1. It is best to buy white eggs because they take dye better. Eggs must be thoroughly washed.
Usually, eggs are stamped with a release date and more. This stigma must be washed off, because it will shine through any paint.
If it does not wash off with a sponge and warm water, try with soda powder and, in extreme cases, with table vinegar. This egg will not cause any harm, because we act on it in this way, for a short time.
Do not press hard on the egg. Since it is wet, it may crack. Eggs must be washed thoroughly. Because only on a clean egg will the paint lie evenly.


3. And one more trick. Soak a cotton pad with alcohol (for those who do not have alcohol at home, use 9% table vinegar) and wipe the eggs with it. This is to remove greasy stains from eggs from fingers. In this way we process all the eggs.
Do not forget! When processing eggs, they must be at room temperature.

4. Put the eggs in a saucepan and add a couple of tablespoons of salt so that the eggs do not crack during cooking. And fill with cold water so that the eggs are completely covered.
By the way, to distinguish old from fresh eggs? When we fill them with water, the old egg floats up, and the fresh egg remains at the bottom.

5. Put the eggs to boil. We will cook on a small fire. Of course we will cook hard boiled. After they boil, you still need to cook for 7-10 minutes, if the eggs are store-bought. If the eggs are fresh country, you need to cook longer, after boiling for 13-15 minutes.
Do not forget, when you take out the boiled eggs from boiling water, be sure to dip them in ice water for a while, this is so that they can be cleaned better later. Just don't chill at all. Eggs should be warm when dyed.
Well, we've got the eggs. Now let's move on to coloring them.

How to paint beautiful eggs for Easter

1. We take a hard-boiled egg, wipe it again with alcohol or vinegar and wrap it in a paper napkin or paper towel, while you don’t have to try to evenly wrap the egg, just wrap it randomly, as if crushing a napkin (do not press hard, crush the egg).
Pour a little vinegar, as if getting wet, from all sides. Press the napkin (squeeze) more tightly to the egg.

2. Take the blue dye and randomly drip onto the egg. Let the dye spread a little.

3. We take another dye, yellow. Also, in a chaotic manner, we apply it to the egg.

4. We take the third dye, we have red and, like the first two, we apply it to the egg.

5. We squeeze the egg with our palms so that the napkin sticks well to the shell. At the same time, we get a napkin, as it were, one-color, evenly colored.

6. Before we paint the egg, we need to make a stand for it. We take an ordinary sponge, stick English needles into it according to the size of an egg and that's it, our stand is ready.

7. We put our egg in a napkin with dyes on a stand and let it dry a little.

8. After a couple of minutes, the egg dried up, carefully remove the napkin from it, trying not to smear the paint.

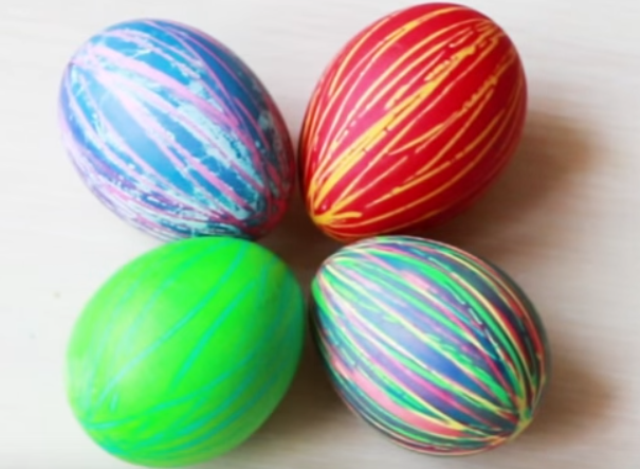
We got such a rainbow colored egg. We put the egg back on our homemade stand and let it dry completely.

How to dye Easter eggs to make them multi-colored

1. We will need plastic small but deep dishes. Pour a tablespoon of vinegar into each of them.

2. Pour the dye into each of the dishes, at first a little, and then it will be possible to regulate, after diluting the dyes with water.

3. Dilute the dyes with water. You don't need much water, somewhere less than half. You will understand when you see what we will do.

4. Take the egg and dip it into the dye by 1/3. We keep it for about 2 minutes.

5. We take out the egg and blot a drop from the bottom. We leave the egg to dry a little on our homemade stand. Since the egg is warm, it dries out pretty quickly.

6. The egg has dried out, lower it into the next dye, again by about 1/3, for 2 minutes. We take it out, also blot a drop at the bottom and set to dry.

7. Dip the remaining unpainted part of the egg into the third dye. We take out, not forgetting to wipe a drop from below, set to dry.

Here we have such a multi-colored egg.

How to paint Easter eggs with polka dots

1. Let's prepare two paints in plastic cups, yellow and blue, a candle, cotton wool on sticks and a stand for eggs. If you have leftover paints from a previous painting, you can use them. We light a candle. we need melted wax.

2. We completely lower the egg into the yellow dye. Let it lie down there for a couple of minutes, take it out and put it on a stand to dry.

3. The egg is dry. We take a cotton swab, dip it in melted wax and in a chaotic manner apply points of wax to the egg with a stick. You can come up with something of your own. Lettering, figurines, stripes, etc.
4. Literally let the wax dry for 10-15 seconds and send the egg to the second paint. Ours is blue. You can take any one you like. Let the egg stand in the paint for 2 minutes.

5. We remove it from the dye, put it on a stand, let it dry. In principle, the egg is ready. We can leave it like this.

6. If you want to remove the wax from the egg, warm it up a little next to the candle, in no case above the egg, just next to it. The wax melts and can be easily removed with a tissue.

How to paint eggs for Easter with a color transition
We need an egg and dye of the same color.

1. Pour quite a bit of dye into a plastic cup so that only it covers the tip of the egg a little more than a centimeter and lower the egg vertically there with the blunt end down. Leave it like that for 2 minutes.

2. Then, using a spoon, add a little more dye. Depending on how large the egg is, how many rings you want to make of different coloring intensity on the egg, calculate how much paint you need to add. We added about 1 cm each. We also leave it for a couple of minutes.

3. Add more dye and also leave for 2 minutes. And so on until we cover the entire egg, leaving the egg in the dye for 2 minutes after each layer.
After we cover the egg completely with the dye, let it stand for 2 minutes, take it out of the dye and put it on our stand to dry.
As we can see, all the stripes on the egg are visible. The egg turned out beautiful, with a gradually weakening tone of paint towards the top.

How to paint striped eggs for Easter

1. Color the egg blue first. Next, we need electrical tape. We cut off 20-25 centimeters of electrical tape and cut the electrical tape lengthwise into narrow strips.

2. We stick the tape on the egg with a spiral. You can paste as you like. Also, you can also make any width of the strip of electrical tape. Thus we glue the whole egg. Press the tape well against the egg so that there are no smudges.

3. Here we have an egg pasted over with electrical tape. We lower it into a pre-prepared red dye, as always for a couple of minutes. We take out the egg, put it on a stand and let it dry.

4. Our egg has dried up, remove the electrical tape. As you can see, under the electrical tape there was a blue color.

Here we have such a striped egg in a simple way.

Mosaic Easter egg coloring

1. We cut a lot of corners from electrical tape and now stick them on a pre-painted yellow egg. We try to stick the corners in the form of a mosaic. Between the corners we make a gap of about 2 millimeters. We lay the corners in random order.

2. This is how we got a glued egg. We dip it in red dye to get an approximately orange color.

3. We take it out of the dye and put it on a stand to dry.

This is how we got the egg. Now it remains only to remove the tape.

How to paint eggs for Easter in onion skins
1. We need onion peel, preferably from red and yellow onions. Eggs with already defatted shells. If you have not degreased them yet, then wipe them with alcohol or vinegar. Squares of gauze about 20 x 20 cm in size. Threads to tie gauze, pan. Question about the saucepan. After boiling onion skins, the pan is very difficult to clean, so pick up a pot that is not needed or in which you paint every year. Or will you paint.

2. For decoration, we will add various leaves and figures cut out of parchment so that the eggs are not so boring.
3. The husk must be placed in a saucepan and mashed to crush. The size of the pan and the amount of husk depends on how many eggs you want to color. Fill the husk with water and put on the stove to cook for 1-1.5 hours.
4. We begin to prepare the eggs. We take gauze, put a leaf on it, face up, carefully straighten all the tips of the leaf, the Wordyou portal writes. Lay the egg on the leaf. Carefully collect all the ends of the gauze in a pile and tighten, strongly pressing the leaf to the egg. We twist the collected ends of the gauze into a tourniquet, than we pull the leaf closer to the egg and tie it with threads.
5. We also make the following eggs. You can even lay out some composition of leaves on gauze. Put the egg in the center and tighten the gauze again. But figures made of parchment paper, it is best to dip in water so that they stick to the egg, and then put the egg in cheesecloth and also gently tighten.

6. Add salt to the boiling onion peel and put the eggs there.

7. We close them all completely with husks and let them cook for 10-12 minutes over low heat. Remember that the eggs must be at room temperature, otherwise they will burst.

8. We take out the eggs from the husk and transfer them immediately to cold water so that they are easier to clean later.

We cut off the gauze, rinse with water and see what beauty we have.
To make the eggs shiny, grease them with vegetable oil. The easiest way to do this is by pouring a little oil on cotton pads.
Well, the eggs are ready. They are perhaps not inferior in beauty to eggs painted with paint.

Original DIY Easter eggs
We took:
- Eggs - 12 pcs.
- Water - 2 liters
- Vinegar - 2 or 3 tablespoons
- Silk fabric (with different patterns)
- Any white fabric
- Rubber bands

1. For dyeing eggs, we took unnecessary men's silk ties, of which we have accumulated a lot. If you do not have unnecessary ties, just take pieces of multi-colored silk.

2. We cut the fabric into squares. We take an egg, put it on the front side of the silk fabric.

3. Wrap tightly so that the fabric does not move over the egg. We twist the tail of the fabric that has turned out at the top, thus tightening the egg even tighter.

4. On top of the colored fabric, we impose the same piece of white fabric. We also twist the tail. We fix everything by putting an elastic band on the tail, twisting it several times. Do the same with all eggs.

5. When all the eggs are prepared, put them in a saucepan.

6. Fill with water, add vinegar and put on fire. After the water boils, cook for another 15 minutes. Reduce the fire so that they do not jump in the pan. Just to boil slowly.

7. After 15 minutes, take out the eggs and put them on a dish. Leave on a plate until completely cooled.

8. When the eggs are completely cool, remove the elastic bands and unfold the fabric. See what beauty emerges from under the fabric. Thus, we unfold all the eggs.

These are the most beautiful eggs we got. Surprise your friends. Enjoy yourself.

Very beautiful Easter eggs

1. We take hard-boiled eggs, ordinary colored napkins and egg white. We tear the napkin into 4 parts. We separate the top color layer from the napkins.

2. Dip the egg in protein and twirl to moisten the entire area of the egg. We lay the egg on the wrong side of the napkin and wrap it. Cut off excess napkins.

3. Dip the brush into the protein and grease the egg on top, thus distributing the napkin evenly over the entire egg, while pressing the napkin more tightly against the shell.

4. Everything is neatly distributed, the egg is ready. We do all the eggs the same way. You can take different napkins. Accordingly, the eggs will be different.
Enjoy!
11. Video - 5 ways to paint eggs in an original way for Easter
Enjoy!
Happy Easter everyone!
Hello everybody!
I would like to say a few words about why colored eggs are one of the main symbols of Easter.
There are several versions of this:
First- according to legend, Saint Mary Magdalene, having learned about the Resurrection of Jesus Christ, came to the emperor Tiberius and gave him an egg, while proclaiming "Christ is Risen!".
To which the emperor Tiberius replied: “It is as hard to believe as it is that the white of an egg can turn red!”. At that moment, the white egg turned red.
The red egg is a symbol of the Resurrection, a symbol of Easter. Just as new life arises from an egg, so the world was reborn through the Resurrection of Christ.
The red color marks the joy of the Resurrection, the rebirth of the human race, but it is also the color of the Blood of Christ shed on the cross, which atoned for the sins of the world.
Second- once, a very long time ago, it was believed that the whole universe, the whole world came from an egg. The egg was a symbol of fertility and the spring rebirth of the sun.
Third- during the entire Great Lent, you can not eat certain foods, including eggs. Wanting to preserve eggs, people boiled them and dyed them with natural dyes so that they could not be confused with uncooked ones. Soon, it turned into a tradition of the Easter holiday.
4th- Easter egg (red) - symbolizes the blood of Christ crucified on the cross.
Easter colored eggs were endowed with protective properties.
Dying eggs red began in Western Europe only in the 13th century. In Eastern Europe, eggs were often dyed gold (yellow).
The custom of painting eggs was preserved mainly among the Slavic peoples. Among the peoples of Western Europe, the Easter egg is also present as a symbol, but it is not necessarily a painted chicken egg, it can be chocolate.
Eggs are dyed in different colors. Paints can be applied by various methods, so the patterns on them are different: spotty, openwork, marble, painted patterns, flowers, ornaments, etc.
The names of Easter eggs depend on how they were dyed.
 Krashenki (galunki)- hard-boiled eggs, painted in one color.
You can get different colors using natural dyes - decoctions of plants, and by changing the time the egg is in the decoction and the density of the decoction, you can adjust the color saturation.
Red - brown (traditional) - from onion peel;
Yellow - from birch leaves, calendula flowers, chamomile, St. John's wort, poplar shoots, bark of young apple trees, cumin seeds, carrots;
Red (pink) - from beet juice, sandalwood chips, bird cherry berries, lingonberries;
Green - from nettle, moss, periwinkle leaves, lily of the valley, shoots of young rye and wheat;
Violet (blue and light blue) - from the petals of the dark mallow, elderberries and blueberries, grape juice, red cabbage;
Brown or black - from oak bark, buckthorn, walnut shells, spruce cones, coffee beans.
Today, eggs are most often dyed with food coloring.
 "Marble" eggs- wrapped eggs with dry leaves, straw, onion peel, wrapped in rags or gauze, tied with multi-colored threads and boiled. It turned out a beautiful and unusual pattern, reminiscent of marble.
One option is to roll a wet egg in millet or rice, wrap it in cheesecloth, tie tightly and dye in the usual way.
 Drapanki (shkryabanki)- eggs painted in saturated or dark colors are patterned with a sharp object - a knife, a thick needle, scissors, an awl.
egg pattern scratch out, having previously drawn it with a pencil. The drawing turns out to be openwork.
Krapanki - "scribble"- cover with drops. The eggs are painted in one color, and when they dry, hot wax is applied to them in drops. Once the wax has cooled, the eggs are placed in a cold solution of a different color. Wait for the paint to dry, then dip the eggs in hot water to melt the wax or you can scrape it off gently with his knife. A hot wax drop can be pulled by the “tail” and made into a leaf.
Today, instead of wax, you can use tape (does not let water through) and cut out any pattern you like from it.
 Pysanky- this is very skillfully painted Easter eggs in stages, using a special technology. Patterns, symbols, elements of flora and fauna are applied to white raw eggs with hot beeswax and paints.
First, the egg was degreased and an ornament (or part of it) was applied with hot wax, which should be white, then the egg was dipped in light paint (usually yellow). When the surface dried, an ornament was applied to it with wax, which should be yellow. The egg was then dipped in a darker color of paint, and so on, until the darkest paint, each color of the pattern protected with wax. The egg was then placed in an oven (not very hot) or held over a candle to melt the wax. Further, they were smeared with vegetable fat so that the pysanka shone.
Such eggs were never eaten, but were used for gifts or amulets.
Malyovanka- "paint - draw" - paint patterns on the egg with paints. Paints can be watercolor, special paints for eggs, stained glass. To prevent the paint from spreading and drying faster, you should paint the egg when it is still hot. Toddlers can paint with felt-tip pens.
 yaychata- these are special Easter eggs made using a special technology from wood, bone, porcelain, stone, glass, precious metals.
They are made for gifts and given to relatives and friends.
The most expensive Easter eggs made using this technology are Faberge eggs, they were made as a gift to members of the imperial family.
RARE TECHNIQUES:
 Wax beads- on the shell, which is covered with wax or paraffin, lay out small beads (beads) or simply stick with glue.
You can string the beads on a thread and wrap them several times around the egg.
 "Slotted Pysanka"- an openwork product is cut out of a single shell.
 Embroidered egg- embroidered in the same way as a tablecloth or napkin, only the material is eggshell.
An egg is taken, its contents are blown out, then it is pasted over with strips of napkins in three layers, thoroughly drying each layer.
Covered with fabric. The seams are closed with any braid (glue). You can make a bow or loop out of braid.
The fabric can still be embroidered with beads, gold, ribbons, etc.
 Decoupage technique- easy to perform. Fragments of the intended pattern are cut out of napkins, the egg is smeared with protein, a fragment of the pattern is picked up with a brush, applied to the egg and gently smoothed.
So the drawing is applied fragment by fragment until the whole egg is decorated. It is better to choose small fragments of the picture so that they fit better on the convex surface of the egg.
PVA glue can be applied to empty places and decorated with semolina (semolina can be painted in the desired color). Very colorful Easter eggs are obtained.
 Mosaic- remove the shell from colored eggs that cracked during cooking, break it into pieces and stick it on other eggs with starch paste.
 Decorations- glue small figured pasta, seeds and seeds, colored cereals with starch paste.
Of course, you already know all the little tricks when painting eggs for Easter, but sometimes you want to repeat everything again.
So that the shells of the eggs do not crack during cooking, they must first be held for about an hour at room temperature, add a tablespoon of salt to the water, and pierce small holes at one end of each egg.
Choose the smoothest eggs - the color will fall on them better.
Before painting, you need to degrease the shell - wipe it with a solution of soap or alcohol - the paint will lie more evenly.
In the water for dyeing eggs, you need to add a little vinegar or lemon juice - the paint will lie flat.
In order not to leave prints on the eggs, you need to paint them with clean hands, without cream.
After dyeing the eggs, leave them in the same solution overnight in the refrigerator, then the paint will be brighter and more saturated.
In order for the painted eggs to shine, you need to wipe them dry and grease them with sunflower oil.
Happy Holidays!!!
Easter is the most important Orthodox holiday that everyone celebrates in honor of the resurrection of Jesus Christ. And on this day there is a tradition to meet guests and treat everyone with beautiful, bright colored eggs. And today we offer you to cook unusual Easter eggs "Mosaic"!
Ingredients
Step-by-step recipe for cooking Easter eggs "Mosaic" with a photo
And we will do the following:
- Boil the eggs right away.
- Next, you will need crushed shells, only dyed. Glue multi-colored pieces around the entire circumference of boiled egg rounds. Then dry them and unusual Mosaic Easter eggs are ready!
Video recipe Easter eggs "Mosaic"
Easter eggs decorated with groats

You can also decorate Easter eggs with groats. Such a culinary masterpiece is sure to please all your guests, kids and household members!
So, in order to make egg rounds according to this recipe, you will need:
Ingredients:
eggs;
cereals;
markers;
brush for glue;
paste.
And we will do the following:
- Let's start making the paste right away. Pour a glass of water into the container, add flour, stir, send to low heat, cook the mass until it thickens.
- Next, boil the eggs, one part should be covered with a thick layer of paste, immersed in the grits. Set items aside for 15 minutes.
- Now take the felt-tip pens, call the children and draw pretty smiling faces. That's it, amazing testicles are ready!
Happy holiday to you!
Easter eggs with mosaic effect: crafting with children. Step-by-step master class with step-by-step photos, useful tips from the experience of making crafts with children.

Easter eggs with mosaic effect:
crafting with children
The Easter holiday is approaching. Together with the children, we have already made interesting crafts for this holiday and we already know its history. We talked about this in previous articles in the cycle of Easter crafts for children:
Today, in continuation of this cycle, we will make an Easter egg using the mosaic technique with the children.
Materials and tools for making Easter eggs with children using the mosaic technique
For work you will need:
- blown eggshell,
- colorful crepe paper,
- PVA glue,
- tassel,
- hair dryer.
Step-by-step description of making Easter mosaic eggs with children
Working with small pieces of paper is very useful for developing children's fine motor skills and for developing a sense of color, because a child needs to pick up a mosaic so that all the pieces of the mosaic look unified, beautiful, holistic.
Step 1
This step is done by an adult. Poke holes in the egg with a needle from opposite sides, blow out the contents of the egg. Rinse the inside of the egg (water can be poured with a syringe). Dry the egg well.
Helpful tips from experience: This egg base is very fragile, so this craft can only be done with children of older preschool age and school age. Kids can be given a wooden egg base for this craft.
Cut the crepe paper into small squares or rectangles. The size of the rectangles or squares is approximately 1.5 x 1.5 cm or 1.5 x 2 cm.

Step 2
Lubricate a small area of the eggshell with PVA glue. Glue multi-colored pieces of paper on the greased surface.
Useful advice: To make it easier to work, periodically dry the pasted surface with a hairdryer so that the pieces do not stick to your hands. At the same time, lightly hold the shell with your hand. Otherwise, our craft may “fly away” under air pressure and break.

Step 3
We continue to decorate the egg. Turn the dried glued part of the egg down and glue the rest of the egg.
Helpful Hint: If, when blowing, you get a hole that is too large (see photo below), then you can first glue it with a light piece of paper, and then stick a piece of any color on top. The hole will become invisible on the finished Easter egg.

Step 4
Put the finished eggs on a plate or in a special stand and stand until completely dry.
Helpful Hint: If you find, after drying the Easter egg with a mosaic effect, that some parts of the mosaic did not adhere well, then you need to glue these pieces of paper and roll the egg in your hands. The paper will adhere tightly to the shell.

Interesting idea: Similarly, you can work with small shreds, gluing them also on PVA glue to the surface of the Easter egg and picking up the shreds by color.

Step 5
Make an Easter craft:
- Option 1. Put the finished eggs in coasters - corks from plastic bottles from mineral water.
- Option 2. And you can carefully stretch a string of twisted multi-colored threads through the holes sealed with paper with a gypsy needle or crochet hook and hang the egg.

Complete your version of decorating an egg for the Bright Holiday of Easter like a mosaic set. Good luck with your creativity! With the upcoming Bright Resurrection of Christ! Until we meet again on the "Native Path"!
You will find more interesting ideas about Easter in the previous master classes of our Easter cycle of crafts for children (links at the beginning of this article), as well as in the Native Path archives here:
Get NEW FREE AUDIO COURSE WITH GAME APP
"Speech development from 0 to 7 years: what is important to know and what to do. Cheat sheet for parents"
Click on or on the course cover below for free subscription
Every housewife knows how to paint eggs for Easter with her own hands quickly and accurately. After all, we learn this art from childhood, helping our parents prepare for the most important Christian holiday. But every year not only new dyes appear, but also staining techniques.
And among them there are quite interesting ones that make it possible to make the most beautiful eggs for Easter at home. We offer you to get acquainted with the most unusual ways of dyeing Easter eggs at home using ordinary dyes.
Those who are used to saying: “I dye eggs for Easter in the traditional way, and it always turns out beautifully,” we will not convince. But even the most inveterate conservatives, having become acquainted with our simple master classes, will change their minds. By experimenting with food coloring, you can get pretty beautiful colored eggs for Easter. We offer to please loved ones with rainbow eggs, which will be full of rainbow colors.
Pre-boil the eggs, trying to prevent cracking.
We dilute the dyes according to the instructions. We need only 3 colors: red, yellow and blue.
It is these shades that will allow you to get all the colors of the rainbow with phased staining.
Dip the egg at an angle into the red dye, where it should sit for about 2 minutes.

We leave it on an impromptu stand until the paint dries completely.

We perform the same operation with yellow and blue dye, while turning the egg at a different angle.
After completing all the manipulations, rainbow eggs can be treated with vegetable oil for shine. As a result, multi-colored beautiful dyes are obtained, full of all the colors of the rainbow.
How to make an Easter egg using dyes and napkins
Perhaps this is the easiest and fastest way to color Easter eggs that does not require much effort. But the result is striking in its unusualness and beauty.

We will need all the same 3 types of dyes and ordinary paper napkins.
First, dilute the dyes in the proportion indicated on the package.

We prepare the egg itself - we wrap it in an ordinary paper napkin. It is better to work with gloves, as caustic synthetic dyes leave unattractive stains on the skin that are difficult to wash off.

We draw one of the dyes into the syringe and apply directly on top of the napkin. After we do the same with the second paint and the third. You can determine the order of application of the solution yourself. If desired, you can alternate shades several times.
At the end of the work, we press the napkin tightly against the egg shell, trying not to crush the egg.

In this form, you need to leave the craft to soak the paint into the shell for about 10-15 minutes.

It remains to remove the napkin and enjoy the excellent result of their labors.

A detailed master class for coloring rainbow eggs in the video:
DIY lace eggs for Easter
A beautiful lace pattern on the eggs can be obtained by using lace when dyeing.

At home, needlewomen will definitely have trimmings of various laces. But even in the absence of such, it is not difficult to buy some lace in a specialized store.

We cut the lace fabric into squares, which will be enough in size to wrap the egg. We tightly tie the edge with a thread or elastic band. Cut off the excess lace.

Dye the eggs dressed in lace with dye diluted in water. Dry the product without removing the fabric.
The result is very beautiful and unusual Easter eggs.
Original striped Easter eggs
Cool striped Easter eggs can be made using ordinary rubber bands. They can be replaced with rubber bands for bracelets and even simple threads.
To color the craft in several colors, start with the lightest shade.
We breed dyes in the required proportion.
First, we color the eggs in the lightest dye or keep a minimum of time in any solution.

Let the product dry.

We put a few rubber bands on warm boiled eggs. Moreover, they can be placed both along the egg and across. Or make an unusual pattern at an angle.

We lower the egg into any dye of a darker shade. After drying, move the rubber bands and paint the craft again, but in a different solution.
As a result, you should get a beautiful Easter egg in cool multi-colored stripes.

How to get cool multi-colored stripes on an egg, see the video:
Beautiful mosaic eggs for Easter do it yourself
It’s easy to make a cool mosaic pattern on an egg using ordinary electrical tape.

First, paint the egg in the lightest shade and leave to dry. We take the usual narrow electrical tape and cut it into arbitrary triangles. Glue the scraps of electrical tape onto the surface of the painted egg.

Until we cover the entire surface of the craft with a mosaic pattern.

It remains to paint the product in a darker dye.

And let it dry on a stand without removing the stickers.

It remains to carefully remove all the pieces of electrical tape from the painted egg.

And admire the cool eggs with a mosaic pattern.

Step-by-step master class in video instructions:
How to make marble eggs for Easter
There are several ways to color beautiful marbled eggs. An amazing drawing can be obtained using ordinary dyes.

To do this, add a little vegetable oil to the water with the dye. A tablespoon of oil per glass of liquid will suffice. It is oil stains that will help when staining to get a fantasy pattern on the shell.

To begin with, you can color the blanks in ordinary dyes.

Then we proceed to staining in a solution with oil. The egg constantly needs to be turned. The more oil can be applied to the surface, the more bizarre the pattern will turn out.

How to paint Easter eggs with nail polish
Another way to get a cool marble pattern.

Keep in mind that the container in which you will make the staining solution will be problematic to wash. Therefore, it is better to use plastic containers, which, after creativity, it will not be a pity to throw them away.
Be sure to work with gloves.

Pour warm water and a little nail polish of various shades into the container.

Gently mix the colors with a toothpick.

We lower the egg into the solution and turn it until the paint covers the entire surface.

We take out the finished egg from the solution and leave to dry.

Thanks to this method, you can get the most unusual colors of Easter eggs. It all depends on your imagination and the availability of shades of nail polish.
Video: beautiful eggs for Easter
Even more unusual egg coloring methods in the video:


