You can make various souvenirs from this unusual material, and then paint them. It is strong and durable and can please a person for many years.
How to prepare play dough
It turns out that you can not only bake pies and cakes from the dough, but also make wonderful paintings, toys and much more. It’s easy to sculpt from it, almost like plasticine, and the dried toy becomes hard and, unlike plasticine, will not melt in your hands. Salt dough makes wonderful and original surprise gifts, and you can prepare such modeling material quite quickly. In addition, it will not require much expense from you - everything you need for this exciting work will probably be found in your home.
Of course, the composition of this magical dough is different from the one from which grandmothers bake cheesecakes. There is no single, “correct” recipe; each master uses his own. We will try to stick to one of the directions, but if you want, you can experiment with the proportions of water, flour and salt. Just make sure there are no cuts or abrasions on your hands, otherwise salt may get into the wound.
For work we will need:
- flour -1.5 cups;
- salt - 1 glass;
- water - 1 glass;
- dry wallpaper glue - 1-2 tbsp. l.;
— sunflower oil- 1 tbsp. l.;
- mixing utensils;
- rolling pin;
- cutting board or any smooth surface;
- plastic bag for storage.
Operating procedure
1. Pour flour and salt into a container and carefully add water little by little (be sure to first flour, then water, and not vice versa, otherwise lumps may form) and mix. If lumps form in the dough, knead them with your hands. So we mix the whole dough until it becomes soft and homogeneous in composition.
2. Add sunflower oil to this mass so that the dough does not stick to your hands, and wallpaper glue so that the dough becomes like plasticine, bendable and elastic. Mix all this thoroughly again and knead the remaining lumps.
3. Now take the dough and place it on a cutting board. Using a rolling pin, roll out the dough several times to completely eliminate the possibility of lumps appearing.
4. Place the dough in a plastic bag and put it in the refrigerator for an hour. After an hour, the dough is ready to use.
During modeling, you should not take all the dough out of the bag at once - it will quickly dry out in the air. It is better to pinch off the necessary pieces and cover the rest with a bag. If there is dough left after modeling, you can put it in the refrigerator - there it can be stored for several days.
If your hands are wet, the dough will stick to them. You need to dust them with flour. And in order to fasten the parts together, on the contrary, the dough needs to be wet. To do this, we wet the parts that we want to glue together using ordinary water and a paint brush.
After the dough figures are molded, you need to dry them; this can be done in two ways.
Method one- just leave the toy with room temperature dry for 3-4 days or more - it all depends on the size of the toy and the temperature of the room.
Method two- roasting in the oven. Place the toy on a baking sheet and place in a preheated oven. The temperature should not be very high, it is better to bake on low heat for 30-60 minutes. The figurine is ready when it acquires a light brown tint, but in no case dark.
It is best to paint a toy with tempera or acrylic paints, as they are the most durable - watercolor will look pale and absorb quickly, and gouache will leave marks on your hands.
The finished product can be coated with clear varnish if desired. And remember, although toys may look durable, they will actually break easily if accidentally dropped on the floor. Therefore, do not leave them on the edge of the table or in places where they can easily break. Glue the salted figures onto frames and pictures securely, so that they do not fall over time.
DIY salt dough gifts. Step-by-step master classes
|
Master class on the topic “Pencil made from salt dough.” Step by step with photos. The master class is intended for children of senior preschool age, parents, teachers. Purpose: interior decoration, gift. Purpose: Making a souvenir. Tasks. 1. Development of creative abilities. 2. Development of fine motor skills. 3. Developing perseverance and accuracy in work. Materials and tools: salty dough: 80 gr. - white, 100 gr. - green, 20 gr. - pink, 10 gr. - red, 10 gr. - yellow, 5 gr. - blue... |
|
Craft for Easter kindergarten. Chicken in shell from salt dough. Master class with step-by-step photos The master class is intended for children of senior preschool age, parents, and teachers. Purpose: interior decoration, gift. Goal: Making decorative decorations for Easter. Tasks. 1. Development of creative abilities. 2. Development of fine motor skills. 3. Developing perseverance and accuracy in work. Materials and tools: salt dough (50 gr. - yellow, 50 gr. - white, 50 gr. - green... |
|
DIY decoupage of the “Dogs” magnet from salt dough. Step-by-step instruction with photo Author: Vera Aleksandrovna Pavlukhina, teacher of additional education, MAOU DO Youth and Youth Center “Zvezdochka”, Tomsk Purpose: making a magnet from salt dough. Objectives: - introduce the technology of making a magnet from salt dough using decoupage technique; - convey your experience through direct and commented demonstration of consistent activities; - increase the motivation and creative activity of master class participants... |
|
Making New Year's Christmas tree toys with children of the preparatory group. Master class with step by step photos.Christmas toy “Mitten” made of salt dough. Step-by-step instructions with photos This toy is beautiful decoration Christmas tree. The Christmas tree toy “Rukavichka” is completed in one academic hour of work, but how much joy and delight it brought to its author, and it is difficult for the teacher-mentor to convey it simply in words. We invite everyone to the master class! |
|
Christmas tree made from salt dough. Spot painting. Master Class with step by step photos. Authors: Polina Tsygina, 7 years old, student at the “City of Masters” MAOU DO Youth and Youth Center “Zvezdochka” in the city of Tomsk and Vera Aleksandrovna Pavlukhina, additional education teacher, MAOU DO Youth and Youth Center “Zvezdochka”, Tomsk Master class will be interesting for primary school children age, their parents, perhaps younger children and simply creative people who love to create decorations with their own hands. Purpose: decorations for Christmas trees... |
|
Autumn crafts from salt dough for preschoolers step by step with photos Master class “Bright colors of autumn” (autumn trees from salt dough) The autumn forest, playing with colors, Weaves wreaths from the crowns of trees, Pampering warm days with its sunny caresses. This is immeasurable pleasure - Walking along the festive path Along the rainbow maples, probably, With a bouquet of deciduous trees in your hand. Author of the master class: Denisenko Dina Vladimirovna, teacher of additional education at a municipal government institution of additional education... |
|
Master class “Fairy Meadow Kolobok”. Modeling from salt dough and plasticine. Step-by-step instructions with photos for childrenAuthor: Olga Kopylova, 8 years old, studying at GKURS (I) Republican orphanage boarding school for mentally retarded children. Teacher: Pargisheva Raisa Nikolaevna State Public Institution of the Republic of Sakha (Yakutia) Republican orphanage boarding school for mentally retarded children. The master class is intended for additional education teachers, technology teachers, parents, as well as everyone who wants to master the technique of modeling from... |
|
Master class “Frog Princesses” using the salt dough modeling technique. Author: Maya Popova, 9 years old, studying at the Republican Children's Home Boarding School. Teacher: Pargisheva Raisa Nikolaevna GKU RS(Y) Republican Children's Home Boarding School. The master class is intended for additional education teachers, technology teachers, parents, as well as anyone who wants to master the technique of modeling from salt dough. Purpose: souvenir. Goal: to make a souvenir using the technique of modeling from salt dough Objectives: Educational... |
|
Stand for Easter Egg do it yourself step by step with photos EASTER HEN EGG STAND Purpose: Use for decoration festive table. Objectives: Educational: Consolidation of the skill of step-by-step work execution. Master the technique of making a souvenir. Developmental: Develop hand coordination, imagination, perseverance. Educational: To cultivate neatness, to encourage the desire to make gifts with your own hands. Necessary materials: salt dough, modeling board, stacks, karan... |
|
Master class of the panel “Three Little Pigs” using the technique of modeling from choux salted dough. Author: Anastasia Nemchinova, studying at the Municipal Budgetary Institution of Preschool Children and Youth Association “Salty Fantasies” in Millerovo Teacher: Nazarova Tatyana Nikolaevna, additional education teacher at the Municipal Budgetary Institution of Preschool Children and Youth in Millerovo Master- The class is intended for technology teachers, additional education teachers, for those who want to master the technique of working with choux salted dough, as well as for those who want to make their own interior decorations... |
|
DIY souvenir for Easter made from salt dough. Step-by-step instructions with photos Crafts using the technique of modeling from salt dough for "Easter" for children 7-10 years old. Author: Kolupaeva Oksana Grigorievna, additional education teacher, Municipal Budgetary Institution of Children's and Youth Center "Harmony", r.p. Chany, Chanovsky district, Novosibirsk region. The master class is designed for children 7-10 years old. Purpose: making a candlestick for the Easter holiday. Goal: creating a “Chicken” candlestick from salt dough. Objectives: Educational: teach children how to sculpt... |
|
Master class with step-by-step photos of the souvenir “Baby Timosha” using the technique of modeling from salt dough. Author: Daria Vinichenko, a student at the MBU Pre-D&Y Association “Salty Fantasies” in Millerovo Teacher: Nazarova Tatyana Nikolaevna, additional education teacher at the MBU Pre-D&Y Millerovo The master class is intended for technology teachers, additional education teachers, and those who want to master the technique of working with salt dough. Purpose: souvenir, gift for a newborn. Purpose: making souvenirs... |
|
Master class “Gift for Mom” using the technique of modeling from choux salted dough. Author: Nazarova Tatyana Nikolaevna teacher of additional education at the Municipal Budgetary Institution of Preparatory Children's and Youth Children's and Youth School in Millerovo. The master class is intended for teachers of additional education, technology teachers, and for those who want to make gifts with their own hands. Purpose: gift for March 8th. Goal: making a decorative cutting board using the modeling technique from choux salt dough. Objectives: Educational: master manufacturing techniques... |
|
Crafts using the technique of modeling from salt dough for Maslenitsa for children 7-8 years old Author: Kolupaeva Oksana Grigorievna, teacher of additional education, Municipal Budgetary Institution of Children's and Youth Center "Harmony", b. village Chany, Chanovsky district, Novosibirsk region. The master class is designed for children 7-8 years old. Purpose: making a souvenir for the Maslenitsa holiday. Goal: creating a souvenir from salt dough. Objectives: Educational: teach children to sculpt salt dough using a template. Developmental: develop accuracy when working with dough. ... |
|
New Year's toy“Cockerel” using testoplasty technique. Master class with step-by-step photos on making a three-dimensional craft “Cockerel” from salt dough. The master class will be of interest to additional education teachers, teachers, children of primary and secondary school age who have been doing testoplasty for 2-3 years, their parents and creative people, who is interested in this type of creativity. Purpose: Decorative decoration, Christmas tree decoration, DIY gift. Usage: For interior decoration... |
From salt dough you can make great amount crafts, for example: flowers, animals, various figures, inscriptions, numbers, toys, paintings and whatever you want! Modeling from salt dough is called bioceramics. The advantage of salt dough is that it is convenient to work with, this material is absolutely harmless and crafts made from it will delight you for several years. In this article we will look at how to make crafts from salt dough with your own hands.
You will need: cup wheat flour, a glass of extra salt, half a glass of cold water, a bowl.

Recipe

The finished salted dough should not stick to your hands or crumble. It should be cool and easy to sculpt. I recommend watching the video master class!
There are two most common ways to dry salt dough. The first method: the finished craft will dry on its own. The main thing is that straight lines do not fall on it Sun rays, otherwise it will crack. The craft can be placed on a flat surface and wait a few days. Second method: dry the finished craft in the oven for 3 to 6 hours (depending on the size of the craft). Drying occurs in batches with breaks. One approach is 1-2 hours. For quick drying in one go, set 75-100 degrees in the oven, and then the craft will dry in an hour. At a temperature of 120 degrees, the craft will dry in 30 minutes, but it is better to dry it naturally.

There are two most common ways to color salt dough. The first method: after drying, paint the finished craft with acrylic paints or gouache using a brush. Second method: food coloring is diluted in water, then added while preparing the dough. When the craft is completely painted and dried, it must be coated with transparent manicure or furniture varnish in 2-3 layers. Each layer must dry before applying the next. This way the craft will last for a long time.

You will need: colored salt dough, stack, clear manicure polish, toothpick.
Master Class

The salt dough star is ready!
Salt dough caterpillar
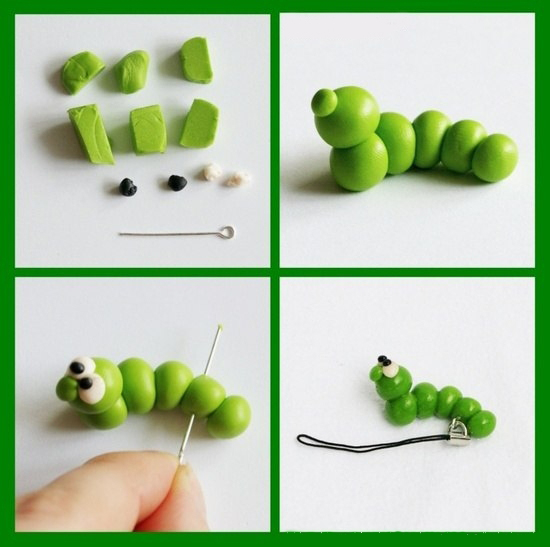
You will need: colored dough, knife, pva glue, toothpick, pendant, clear manicure polish.
Master Class
- Roll out the sausage.
- Cut it into 6 equal parts.
- Roll into balls.
- Glue 5 balls together.
- Glue the head.
- Make a nose and eyes, then glue them on.
- Poke a toothpick into the hanging area.
- Dry the craft.
- Attach the pendant.
The salt dough caterpillar is ready!
Salted dough apple

You will need:
Master Class
- Make half an apple, make the inside flat, pressing it onto a flat surface.
- Make a thin flat center and glue it to the main part.
- Roll 6 seeds and a stick, then glue to the apple.
- Blind the leaves, then glue them.
- Dry the craft.
- Apply varnish and wait until completely dry.
The salted dough apple is ready!
Salt dough elephant

You will need: colored salt dough, pva glue, clear manicure polish.
Master Class
- Make the elephant's body by rolling an elongated ball.
- Blind 4 legs in the shape of plump sausages.
- Make a proboscis.
- Make the elephant's ears in this way: roll out 2 flat cakes, glue flat cakes of the same shape of a smaller size and a different color to them.
- Make a small ponytail.
- Blind your eyes.
- Assemble the elephant in the following sequence: glue the legs to the body, then glue the proboscis, then the ears, eyes and tail.
- Dry the craft.
- Apply varnish and wait until completely dry.
The salt dough elephant is ready!
You will need: salt dough, foil, a candy bowl or similar plastic container, gouache, a brush, clear manicure polish, a modeling board, a knife or a stack.
Master Class


You will need: salt dough, nail scissors, PVA glue, acrylic paints or gouache, manicure brush.
Master Class

Salt dough hedgehog is ready!
Owl (eagle owl) made from salt dough

You will need: salt dough, pva glue, nail file, manicure scissors, acrylic paints or gouache, brush, wooden board with a pendant, clear manicure varnish.
Master Class

The salt dough owl is ready!

You will need: salted dough, the base on which the craft will be attached, for example, a board or plate, a glass or a knife, a sheet of paper, a simple pencil, a garlic press, a rolling pin, pva glue, acrylic paints or gouache, a brush, clear manicure polish, cloves.
Master Class

Salted dough fruit basket is ready! I recommend watching the video master class!

You will need: salt dough, knife, rolling pin, simple pencil, sheet of paper, sandpaper, acrylic paints or gouache, brush, transparent manicure varnish, glue gun or pva, base for crafts, for example: a board with a frame, transparent manicure varnish.
Master Class

Salt dough pencil

You will need: water, flour, extra salt, cardboard jar for the frame, PVA glue, scissors, a piece of decorative rope or corrugated paper, gouache, brush, button, stacks, acrylic varnish for crafts, toothbrush.
Master Class
- Knead the salted dough in this way: add a glass of flour, a glass of salt, add water, then knead until the desired consistency of the dough. Separate part of the dough, add beige gouache, then knead.
- Roll out the cake to a thickness of 10-15 mm.

- Apply PVA glue to the outer rim of the jar and wrap it with dough. Cut off the excess with a stack and smooth the joints with a damp brush.
- Create a small dotted texture with a toothbrush on the surface of the dough.
- Knead the brown dough, roll it into a flat cake 10-15mm thick.

- Cut a 5cm wide strip of brown pastry and glue it to the bottom of the jar.
- Make 2 large owl eye bases from white dough, then glue them on.
- Make a beak out of brown dough and glue it on.
- Make eyes from turquoise dough and glue them on.
- Roll out 8 strips of pink dough, twist them into 4 flagella and make a bow, then leave it to dry for 2 hours.
- Make droplet-shaped owl wings using brown dough, then glue them on.

- Weave ropes of beige dough and glue them onto the neck of the jar.
- Roll out a sausage from white dough, draw the texture of the lace with a stack and glue it as a collar under the beak.
- Place the craft in a warm place for a day.
- Paint the bottom and wings with brown gouache and decorate with white dots.

- Draw the pupils and eyelashes with black gouache, wait until the paint dries, then paint white highlights on the eyes.
- Glue a pink bow above the wing.
- Glue a button with a bow from a corrugated strip onto the lace.
- Cover the craft with varnish and wait until it dries completely.
The salt dough pencil is ready!
Salt dough dachshund

You will need: salt dough, simple pencil, scissors, cardboard, paints, brush, rope, toothpick, foam sponge, clear varnish, PVA glue.
Master Class

Salt dough dachshund is ready!
Boletus mushroom made from salt dough

You will need: salt dough, light bulb, paints, brush, foil, cardboard, masking tape, superglue, PVA glue, paper napkins, clear varnish, stack.
Master Class

Boletus mushroom made from salt dough is ready! I recommend watching this video!
Funny salt dough pigs

You will need: salt dough, paints, brush, foam sponge, stack, thin rope, toothpick, black gel pen, PVA glue.
Master Class

Funny salt dough pigs are ready! I recommend watching this video!

You will need: salt dough, baking sheet, rolling pin, knife, sheet of paper, acrylic paints, brush, ribbon, water, shoehorn, pencil, sandpaper, clear manicure polish.
Master Class

0 62 411
Modeling is one of the most useful activities for kids. With its help, not only fine motor skills of the hands develop, but also perseverance, creative thinking and coordination of movements are developed.
One of the best materials for modeling with your child is salt dough. It is absolutely safe and does not contain harmful additives and easy to work with. DIY salt dough crafts will become wonderful souvenirs for your relatives and friends.
Universal recipes
You can find a great variety of salt dough recipes. Each master adds his own additives to them, selecting the desired consistency. The main products for kneading dough are salt, flour and water.Depending on its purpose, its thickness may vary:
- dense dough - for large parts and creating massive panels;
- universal dough of medium consistency - it is convenient to make small pictures and figures from it;
- soft dough- delicate and pliable, it is suitable for small elements, exquisite flowers and figurines.
Thick dough
To work you will need:- wheat flour - 1 part;
- table salt - 1 part;
- water - 0.7 parts.
That is, to knead this type of dough you need to take one identical measure (glass, cup, tablespoon) of salt and flour and 0.7 of the same measure of water.
Combine dry ingredients in a deep bowl and add little by little cold water. The dough should be homogeneous and very dense. There will be grains of salt in it - this is normal, don’t worry. Depending on the humidity and quality of flour and salt, you may need a little more or less water. Therefore, you can’t pour it into the dough all at once.
Medium consistency dough (all-purpose)
To work you will need:- wheat flour - 1 part;
- water - 1 part;
- table salt - ½ part;
- finely ground salt (extra) - ½ part.
Soft dough
To work you will need:- wheat flour - 1 part;
- hot water - 1/4 part;
- finely ground salt (extra) - 1 part;
- PVA glue - ¾ parts.
This dough is ideal for complex work. It holds its shape perfectly, preserving the prints and texture created on it. Its quality directly depends on the quality of the chosen glue.
The figures made from salt dough with glue differ special strength. They will delight their owner for many years.
- If you plan to color finished products, it is better to use wheat flour, although you can also use rye flour for salted dough.
- You cannot use iodized salt - the finished figures may crack when drying.
- The dough can be tinted while kneading. For this, food coloring or watercolors are used.
- The finished dough must be wrapped in cling film or a plastic bag to prevent it from drying out.
- A failed dough can be revived. If the dough is too liquid, you need to add a little more flour and knead again; if the dough is too tight, moisten it with water and knead until it reaches the desired consistency.
- Do not add fat or hand cream to the dough from which you plan to paint the products - the paint will apply unevenly.
- The finished dough should be stored in the refrigerator for no more than 2 days. It loses its qualities and it will be inconvenient to work with it.
- It is best to sculpt volumetric products on wire or cardboard frames so that they do not fall apart.
- Crafts can be dried naturally, leaving them for a couple of days, baked in a warm oven, or left next to the radiator. It is strictly not recommended to place figurines on the battery itself to avoid cracking.
- It is best to paint crafts with acrylic paint or gouache. Watercolor should not be used: there is a risk of getting wet and ruining the product.
- The junction of the parts must be moistened with water using a brush. This way they will connect firmly and quickly.
- The finished souvenir can be coated with clear nail polish or acrylic varnish. This will protect it from moisture and the paint from fading.
Cute hedgehog - toy for kids
Do you want to know what you can make with your child using salt dough? Start with the simplest crafts. The younger your baby, the simpler the products for joint creativity should be. Try to make a prickly hedgehog, and detailed description The process in this MK guarantees an excellent result and a good mood from a useful activity.
First of all, prepare universal salt dough and nail scissors. Roll a piece of dough into a drop-shaped piece.

The hedgehog's eyes and nose can be made from beads, black peppercorns, or pre-colored dough.

The needles are made using cuts. Use the tips of the scissors to make small cuts, lifting the needles up.

Perform the next row in a checkerboard pattern - with an offset. Row by row, make cuts until the entire back of the hedgehog is covered with needles.

Dry the finished toy in the oven or simply in a warm and dry room. If you wish, you can color it or entrust this important task to your child.

Original souvenir - funny dachshund
You can start preparing for the future ahead of time. New Year's holidays and make a funny dachshund as a gift for friends.
To work you will need:
- universal salt dough (see recipe above);
- cardboard, pencil, scissors;
- paints and brush;
- a piece of rope;
- clear nail polish;
- toothpick;
- foam sponge;
- glue "Dragon".
Transfer the template to a piece of cardboard and cut it.

Roll out the dough to approximately 5mm thickness on baking paper. Attach the template and cut out the outline of the dachshund along it. Carefully remove the trimmings so as not to deform the workpiece.

Roll two balls and form them into oblong dachshund eyes. Glue them with a drop of water to the head of the workpiece. Moisten all sections of the dog with water and smooth it with your fingers to remove all irregularities.

Use two small pieces of dough to make eyelids and glue them above the eyes. Use a toothpick to outline the ear, paws, mouth, nose and body contours.

Now you need to add volume to the workpiece. Roll the dough into an oval, glue it onto the ear and smooth the joint with a wet finger.

Add volume to the dachshund's back and tail in the same way.

Use a toothpick to press oblong dents around the perimeter of the figure. Make them randomly of different lengths from the edges of the body to the center.

It's time to dry the workpiece in a warm oven. Bake it until it is completely firm.
The dry figurine needs to be painted. Cover all areas where there are bulges and dents with black gouache.

After the first coat of paint has dried, paint the dachshund yellow. Put a little paint on a foam sponge and tint the entire body, while the dents should remain black - do not overdo it.

Draw the eyes of the dried dachshund in white. Make any inscription you wish.

Glue a piece of rope to the back of the craft.

Cover the product with clear varnish and let it dry. The result of the work done is impressive - the mischievous puppy is ready.

Dog with original coloring:


Spectacular fish - step-by-step master class
Try making a beautiful fish with your child. Just follow detailed instructions- and even a little helper will be able to master this modeling technique.
To work you will need:
- universal salt dough;
- brush;
- corrugated felt-tip pen cap;
- ruler.

Pinch the dough on one side of the circle with two fingers, forming a tail.

Correct it and smooth out any rough edges.

On the opposite side, make a mouth for the fish using the handle of a brush.


Use the edge of a ruler or the blunt side of a knife to press impressions on the tail and fins.

Roll small balls and glue them onto the fish's head. These will be the eyes.

Make pupils from smaller balls and press them onto the eyes with the handle of a brush.


It's time to decorate the blank. Use the cap of a felt-tip pen to press down the first row of scales.

Roll a lot of small balls. Glue them with a drop of water to the body of the fish immediately behind the cap imprints and flatten them with the back of the brush.


If there is a suitable imprint, make imprints in the shape of a starfish; if not, make do with an already familiar cap or take another template.

Then push two more rows of cap impressions.

Roll into a thin sausage to form a tail.

Glue it to the blank on the edge of the tail. Fill the entire tail in the same way.

Next, chaotically stick and push a few more small balls.
Dry the resulting workpiece in a warm oven.

Color the fish, guided by your ideas of beauty and the colors available. If you glue a magnet to the back of it, it will proudly take its place on the refrigerator, decorating the kitchen of its happy owner.
Here are some more ideas with fish:


Cheerful boletus mushroom
The initial stage of learning to sculpt is already behind us - you can begin to make more complex products from universal salt dough. Try to master the lesson of making a funny big-eyed boletus. Such an interesting mushroom will be appreciated not only by children, but also by adults.
To work you will need:
- universal salt dough;
- burnt out light bulb (classic pear-shaped);
- cardboard;
- acrylic paint or gouache;
- foil;
- paper napkins;
- masking tape;
- Super glue.

Cut a ring out of cardboard and put it on a light bulb - this is the basis of the future mushroom cap.

Form a hat of the desired size from crumpled paper napkins. Secure the structure with tape.


The result is something like this.

Wrap the hat in foil for added strength.


For the hat you can use dough of any color; later the whole toy will be painted. Roll out a piece of dough into a circle at least 3 mm thick and stick around the top of the mushroom cap.

Remove the hat and seal the bottom.

Use the blunt side of a knife to press the strips.

Secure the cap to the mushroom stem using superglue or Moment. It should be slightly tilted towards the back.

Get started with the design. Blind and attach the arms, legs and nose to the fungus.


You can decorate the figurine with a funny caterpillar or make another decorative element, such as a ladybug.

Dry the finished piece.

Paint the figurine, draw eyes and a nose and varnish. The amazing fungus is ready. You won’t be able to pickle it and eat it, but you can easily decorate a shelf with it.

Funny pig pendants
Such funny pendants are an idea for an unusual Christmas tree decoration or a cute souvenir for people dear to you. Such a themed gift will come in handy, because the patron of 2019 is the yellow pig.
To work you will need:
- universal salt dough;
- toothpick;
- thin rope;
- paints and brush;
- foam sponge;
- black gel pen;
- Super glue.
Dear readers, today we offer you crafts made from salt dough. Modeling is a fascinating activity, like any other creative activity. If you've never done this, try it! Once you acquire the skills, you can create masterpieces. This is also an opportunity to spend valuable time with your children.
Salt dough modeling
Dough is a surprisingly flexible material for sculpting various shapes and compositions: delicate, soft. Unlike regular plasticine, the dough does not stain your hands. When kneaded correctly, the salt dough does not crumble, does not crack, and is preserved sufficiently long time. Although it should be noted that the dough is a rather fragile material if handled carelessly.
From salt dough you can make simple figures and products, for example, leaves, mushrooms, apples, and quite complex options - trees, figures of animals and people, as well as various multifaceted compositions.
A distinctive feature when working with this material is that the work process does not require any special tools or devices. It is best to sculpt with your hands or use primitive tools that are always at hand. It should be noted that products made from salt dough are quite heavy (dense), which does not allow creating compositions of large sizes. Therefore, volumetric compositions and panels should not be very large.
For the test:
Flour - 2 parts
“Extra” salt – 2 parts
water (necessarily cold) - 1 part
plastic bag for storing dough
To work with the test you will need:
a jar of water to wet your fingers and brushes,
rolling pin for rolling out dough,
brushes,
paints,
toothpicks,
nail scissors
Drying a craft made from salt dough
Drying is a very important stage in the manufacture of salt dough products. Imagine: you conceived and created something wonderful from it. And suddenly - as a result of hasty or incorrect firing - the product cracked and everything went down the drain! This is truly a big disappointment!
Outdoors at room temperature
You can dry the craft outdoors in a dry place. The thicker the product, the longer it will take. But this method is the most economical.
When air drying, moisture evaporates slowly, so it takes 1 day of drying to dry every millimeter of product thickness.
In summer, use the heat of the sun to dry: place the product ready for drying in a sunny place.
In the electric stove oven
Dry the craft for two days, first in the open air, then in the oven at a temperature of 50°C, gradually increasing the temperature, but not higher than 150°C.
The product should not remain damp. Its readiness is determined by its sound. By tapping the finished product with your finger, you will hear a ringing sound. If the sound is dull, the product needs to be dried.
On the heating battery
This method is very convenient to use in winter, when the central heating radiators are well heated. Place the craft on foil or cloth and leave it on the radiator until completely dry.
Glazing products with salt solution and browning
When the product is dry, it can be glazed. After this, the product will sparkle with tints of shades from white to golden brown.
Glaze the product for an hour. To do this, use a brush to lubricate it with a strong salt solution (the ratio of water and salt is 2:1), and then place it in the oven at a temperature of 50°C to 150°C. When the first layer of solution has dried, the product is lubricated again. The operation is repeated several times. This method gives the figures smoothness. Since the salt crystallizes on the surface of the product, it acquires a special noble whiteness.
However, the figure can be given a different shade depending on temperature regime ovens. At a temperature of 50°C the product remains white, at a temperature of 150°C it acquires an intense beige color. A golden brown hue is obtained at a temperature of 200°C.
Since the “salt glaze” is formed by salt crystals, products treated in this way do not need to be varnished.
Glazing products with egg yolk
The figurine can be given an appetizing look of golden brown dough by glazing with a mixture egg yolk and water. After glazing with salt, the mixture is applied to the product several times and dried at a higher temperature (approximately 150°C). The oven door must be closed.
White color
The product will remain white after air drying or oven drying if the firing temperature does not exceed 125°C.
Brown color
During the last hour of drying at a temperature of 150°C, brush the products with beetroot syrup diluted with water.
Butter effect
The products will look like buns from yeast dough, if in the last hour of firing in the oven at a temperature of 150°C, first apply a “salt glaze” to them, and then, using a brush, brush them with a mixture of milk and water or a mixture of egg yolk and water. If the temperature is raised to 200°C, the brown color will be darker.
Painting and varnishingsalt dough products
Coloring
Finished products can be painted in whole or in part. Products in the color of natural dough with minimal use of paints look great. However, if you want to completely paint the piece, it is recommended to use acrylic paints. After drying, they do not stain your hands or smear.
You can also use watercolor paints for coloring. To do this, watercolor is stirred very thickly with a brush with a minimum amount of water and applied to the product so that the paint does not spread. Works painted in this way must be secured with varnish.
Gouache paints can also be used for coloring. In this case, you should add a little PVA glue to the gouache.
To color the finished kneaded salted dough made from wheat flour, you need to add food coloring to it drop by drop. If the product is monochromatic, paint can be added when kneading the dough, and if the product should be multi-colored, then the finished, kneaded dough should be divided into parts according to the number of colors.
Advice
The finished, kneaded dough is divided into as many parts as the number of colors it needs to be painted. Then small balls are molded from these parts, in the middle of which depressions are made. Next, paint is dripped into these recesses, after which the dough is thoroughly kneaded until it is evenly colored.
Varnishing
To prevent paints from fading or drops of water accidentally falling on the surface of the product from spoiling the work, the figures are varnished.
Both liquid and thick varnish are used. Liquid varnishes do not protect salt dough products well, since they penetrate inside, and therefore the product must be varnished many times. Still, use liquid varnish if you want the product to look more ruddy and less shiny. If the composition is liquid, the product must be varnished and dried several times.
Thick transparent varnishes, on the contrary, reliably protect the product from moisture, and they carefully cover the models on all sides. If you don't like a mirror finish, use a matte clear varnish. If the composition is thick, it is enough to varnish the product once or twice.
Manufacturingsalt dough products
Try to sculpt or cut the product directly on the baking sheet, while the back side of the product remains flat and there is no damage when transferring it to the place of drying and firing. Before starting work, moisten the baking sheet with water using a brush so that no air bubbles form between the dough and the baking sheet.
Cutting with baking molds
Roll out the dough to a thickness of 0.5 cm with a special roller or rolling pin on a work board or directly on a baking sheet. Now press any molds into the dough.
To connect parts of products into one whole, moisten them with a wet brush in advance, and they will stick together thanks to the adhesive properties of flour. If you need to overlap pieces, apply water to the back of the piece being overlapped, otherwise the water stains that have spread will change color as they dry. And so you don't doubt good result, brush the entire product with a brush dipped in water before it goes into the oven.
Pattern cutting
Roll out the dough to a thickness of 0.5 cm on a work board or baking sheet. Place the prepared template on the dough and use a thin, sharp knife to cut out a shape along the edge of the template.
Then carefully separate the template, moisten the edges of the figure with water using a brush and trim with a wooden stick.
Important to remember. Templates are best made from thin cardboard with a waterproof coating. Regular cardboard may just stick to the dough.
Zoom in and out
Draw your chosen scenes on checkered paper. If they need to be reduced, take another sheet in a smaller cell. Then transfer the intersection points of the pattern with the cells and outline the contours. To enlarge the template, redraw it on paper in a larger square.
Modeling products from salt dough
There are several basic sculpting techniques. The production of almost all elements is based on a ball and a sausage.
To decorate products made from salt dough, many different small elements are used: flowers, ribbons, berries, leaves, braids, etc.
To make leaves, you need to roll out the sausage, cut it into equal parts - cylinders, which should then be rolled into a ball. The ball should be flattened into a cake and a sheet should be formed with the thumb and forefinger. The veins can be drawn using a toothpick.
Roses can be made from thinly rolled ribbon carefully wound around a toothpick. At the same time, the desired size and shape of the flower is formed.
When making figurines of people, the basis is a sausage, which must be given a cone shape. To sculpt the head, use a dough ball of the required size. It is better to cut out more complex flat elements or figures from rolled dough using a pre-made template.
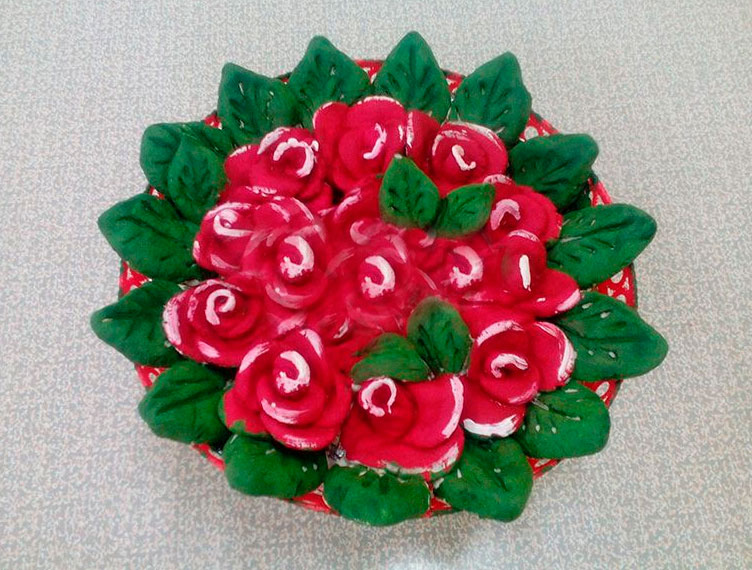
Basket with fruits and flowers
Basket size - 14 x 15 cm.
Make a basket box from 120 g of dough.
To make a basket weave pattern, use a ruler to draw vertical lines on the basket frame. Along these lines, flatten the dough on both sides with two forks.
From 50 g of dough, roll 2 sausages of 17 cm each, make a handle out of them and attach it to the basket on both sides, moistening the joints with water.
Roll the dough into a roll with a diameter of 1.5 cm and cut it into equal pieces 5 cm long. Make balls from these pieces, squeeze them a little on top and bottom and stick in cloves (spices) - you get apples.
Cut the dough into pieces measuring 5 x 1 cm and shape them into leaves.
Make two roses using toothpicks and place them on the leaves.
bunch of grapes make small balls.
The cart is ready!
Hedgehog

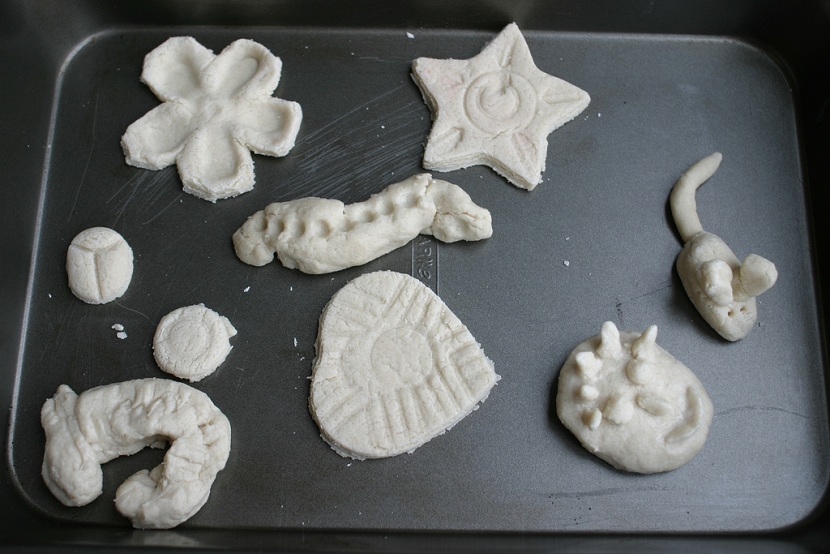
We offer you samples of salt dough products that you can make.


Creative success, dear friends!
Modeling is one of the types of art. In the process, it is possible to produce products of incredible beauty, used as decorative elements.
Modeling classes also develop fine motor skills and imagination, which makes them especially useful for children.
Very often, salt dough is used to make crafts. It's worth finding out what it is and how to use it to create jewelry.
Features of sculpting
Making salt dough is easy. Every person has modeling skills acquired in childhood. You just need to take into account the rules for preparing the dough, drying and decorating.
Preparation of material
There are several cooking options. You can use any of them. One of the popular methods is the following.
It will require:
- salt – 1 tbsp.;
- flour – 1.5 tbsp;
- water – 125 ml;
- PVA glue or starch - 1 tbsp. l. (needed when sculpting small items).

All ingredients should be mixed and the dough should be prepared as for dumplings.
Tools for work
During the sculpting process, you will need some devices that will speed up the work and improve the results. The most commonly used:
- board for rolling out dough;
- a small rolling pin (you can replace it with a bottle);
- molds;
- brush;
- ballpoint pen refill (useful for creating patterns);
- buttons, rings, lace (they are needed to make impressions);
- paints.
In addition to these, other devices may be required. It depends on the intent. You will also need water - without it such creativity is impossible.
Storage methods
The prepared dough can be used for 3 weeks if stored correctly. Best option– Wrap it in plastic and place it in the refrigerator.
For work, it is worth taking small pieces, since the mass quickly hardens and a crust forms on it.
Therefore, it is worth separating as much dough as will be used at a time.
Drying, painting, varnishing and product care
Made items need to be dried so that they last longer. Several methods are used for this:
- The oven is heated to approximately 55-80 degrees. The items are placed in a special form and kept in a slightly open oven for about an hour.
- The products are laid out on a surface made of wood or plastic and dried in the open air. It takes 3-4 days, but the results will be better. Do not expose crafts to sunlight.
- The items are placed in a cold oven and heated to 150 degrees, then turned off. There is no need to take out the crafts right away; they should cool down with the oven.
Dough products are often varnished. It improves appearance work and allows you to preserve the craft longer. If the item has been painted, a coat of varnish will prevent the colors from fading.
It is most convenient to use aerosol varnish. In this case, a single application is sufficient. Liquid varnish has to be applied in several layers, but this is also a good way.
Sometimes varnishing is not carried out. If the drying was correct, the leads will last a long time without varnishing.
The design of the figures may vary. They can be left in their original form - this is also attractive. But they are often painted using gouache, acrylic or watercolor paints.
You can color it like this:
- mix watercolor with water and apply with a brush;
- add PVA glue to the gouache and cover the product with the mixture;
- add when kneading dough food coloring or fruit juice to give it a tint.
You can use additional decorations to make the craft original. Beads, shells, threads, ribbons, cereals, beads, etc. are suitable for this.
Types of crafts
There are a lot of products of this type. They can be used to decorate your home or as a gift as they look very beautiful. Therefore, these crafts are often prepared for some holiday.
In addition to holiday products, you can sculpt from dough just like that. Entire compositions are obtained, so it is worth knowing what the individual elements look like.
New Year's options
In building New Year's decorations Children will be happy to take part. These crafts include Christmas tree toys. The easiest option is to cut out New Year’s themed figures, bake them in the oven and paint them. After this, a hole is made in them for the rope. But you can also dream up.
They make a lot of holes in the figurines or decorate them with beads and seed beads (in this case, they should be dried only naturally, without an oven).
Ribbons or sparkles are used as decoration (they are applied after drying to a layer of PVA glue). Coloring is allowed dry dough markers.
You can make an impression of the child's palm on the test and decorate it beautifully. This toy will remain as a keepsake.


To make such products, you should use your imagination, then you will be able to create original jewelry.
Congratulations on March 8
They are often used as gifts for International Women's Day. The most commonly used types of crafts for this holiday:
- keychains in the form of flowers;
- candlesticks;
- medals;
- pendants, etc.


These items are painted in different colors and decorated with beads, sparkles and beads.
On February 14
The most popular on this day are heart-shaped accessories. From the dough you can make:
- hearts (simple or decorated);
- keychains in the shape of hearts with paws;
- couples of loving hearts;
- Photo frame;
- Garlands.


You can decorate souvenirs for this holiday with sparkles, ribbons, and beads. You can also sculpt additional details - they are also suitable as decoration.
Flower shapes
You can sculpt flowers different ways. Sometimes they are made flat by simply cutting them out of the dough using a cookie cutter. You can make embossed flowers - they take longer to sculpt, but look more attractive.
In this case, flower fragments are sculpted separately and then fastened together. To give the products a natural look, veins are drawn on them. The choice of technique depends on the design.

A flower is rarely considered as a separate product. Most often it is an element of the composition.
Examples of modeling crafts
In order for the craft to be beautiful and consistent with the design, it is worth understanding how to work on it. For those who are well acquainted with the art of sculpting, this is not difficult. But beginners need instructions.
Salty beads
They can become a stylish accessory. They should be done as follows:
- Form balls from the prepared colored dough (the same or different in size, depending on the idea).
- Each ball must be pierced with a toothpick and left to dry in this form.
- After this, the toothpicks are carefully removed, and the resulting beads are put on the lace.

The dough for such a product can be multi-colored or plain. It is also allowed to paint finished beads with markers.
Dough horseshoe
It is often used as a souvenir for good luck.
Instructions:
- You need to cut out a template from cardboard.
- Make a figure using this template using dough rolled out to a thickness of 1 cm.
- This figurine can either be dried and painted immediately, or additional parts can be sculpted, attached, and baked after that.

Horseshoe dough can be colored, but most often it is colored later.
Star

It is made using a mold or a stencil is pre-cut. The dough should be rolled out to a thickness of 1 cm.
The resulting figurine is decorated and holes are made with a toothpick.
You can humanize the star by adding eyes, a nose and a mouth.
Color it after drying or immediately take colored dough.
Salt dough animals
Making animals out of dough is a lot of fun. They often sculpt hares, sheep, small elephants, birds, etc. The technique of working on them can be different and depends on how believable the image you want to create.
Such products can be part of compositions or be a decorative element, but they are often used separately - as key rings or pendants.


They can be made flat or embossed. To create flat figures you will need a stencil on which the desired animal is cut out. It is dried and painted first with a pencil and then with paints.
Relief figures are more difficult to create because they consist of several elements. For example:
Lamb. Her paws are made of 4 balls, which must be arranged in a square. Another ball is placed on top - the body. The head is attached to it, ears and horns are made. The back is covered with small balls to create fur. This is followed by drying and painting.

Owl. Waves are made on a round cake using a felt-tip pen cap - this is the future of plumage. The side edges must be folded inward to form wings. The upper part is also folded inward - the head is formed from it, after which the eyes and beak are imprinted.

Elephant. Its body is made from a slightly elongated ball, and its legs are made from sausages. The trunk, ears and tail are molded separately. All parts must be assembled, dried and painted.

Figuring out how to sculpt other animals is also easy. You can also look for instructions in specialized literature.
Fruit compositions
It's easy to create vegetables and fruits from dough. Children often use them to play with dolls - in the form of food. When creating such figurines, it is worth choosing a color that is similar to the natural one, so the doll food will look like the real thing.


Possible difficulties and their solutions
During modeling, difficulties may arise with crafts. This:
- The appearance of cracks or bubbles after drying. This may be caused by improper drying. Next time you should choose slow drying in an open oven or natural drying.
- Formation of cracks after painting. This happens if the dough is not dried well. You need to let it dry, sand it with sandpaper and repaint it.
- Chipping of elements. They are sometimes glued with PVA glue. You can also smooth out unevenness or decorate it.
- Dull color after dyeing. This problem can be solved by applying varnish to the surface of the product.
Making crafts from salt dough is a fun and educational process. It is especially interesting for children. For them, this is an opportunity to develop imagination and thinking. Therefore, parents should teach their kids this art and take the time to sculpt with them.


